# Spring Security 的基本配置
在之前的 Hello World 示例中,由于 Spring Boot 的自动配置,有很多配置都是采用的默认配置。
如果是在 SSM 项目中整合使用 Spring Security 你要运行一个 hello world 级别的示例,你还要配置不少东西。Spring Boot 的自动配置救了我们。
# 1. 配置类
我们通过配置类实现的对 Spring Security 的配置,而 Spring Security 要求所有的配置类都要继承自 WebSecurityConfigurerAdapter 类(并为其标注 @EnableWebSecurity 注解)。
@EnableWebSecurity
public class SpringSecurityConfig extends WebSecurityConfigurerAdapter {

    @Override
    protected void configure(HttpSecurity http) throws Exception {
        ...
    }

    @Override
    protected void configure(AuthenticationManagerBuilder auth) throws Exception {
        ...
    }

}
注意
WebSecurityConfigurerAdapter 要求我们重写的 2 个方法都叫 configure !它俩同名不同参。
你得时刻注意谁是谁。哪些配置放这个 configure 里,哪些配置又是放那个 configure 里。
由于 @EnableWebSecurity 注解的功能涵盖了 @Configuration 注解,因此这个配置类上不用再标注 @Configuration 注解。
另外,@EnableWebSecurity 注解还有一个 debug 参数用于指定是否采用调试模式,默认为 false 。在调试模式下,每个请求的详细信息和所经过的过滤器都会被打印至控制台。
对于 Spring Security 的行为的具体配置,我们是要重写 configure 方法。
# 2. 两个 configure 的配置代码
再次强调
请注意两个 configure() 谁是谁。
HttpSecurity 的哪个 configure() 配置方式实际上是在配置 Spring Security 过滤器链相关内容。
# 2.1 参数类型是 HttpSecurity 的 configure 方法
我们之前对 Spring Security 的配置只涉及到『参数是 auth』的 configure 方法。
在我们自定义的 SpringConfig(WebSecurityConfigurerAdapter 的实现类)中还有一个『参数为 http』的 configure 方法。
@Override
protected void configure(HttpSecurity http) throws Exception {
    http.authorizeRequests()
        .anyRequest()
        .authenticated();   // 1
    http.httpBasic();       // 2
    http.csrf().disable();  // 3
}
以上配置的意思是:
让 Spring Security 拦截所有请求。要求所有请求都必须通过认证才能放行,否则要求用户登陆。
要求用户登陆时,是使用 http basic 的方式。
暂且认为是固定写法。后续专项讲解。

# 3. Spring Security 自带的 2 种认证方式
Http Basic 认证
自带的表单页面
这是两个不需要我们『额外』写代码就能实现的登录 “界面” 。
@Configuration
@EnableWebSecurity
public class SpringSecurityConfig extends WebSecurityConfigurerAdapter {

  @Override
  protected void configure(HttpSecurity http) throws Exception {
    http.httpBasic(); // 或
    http.formLogin(); // 两者二选一。

    ...
  }
}
# 3.1 Http Basic 认证
SpringSecurityConfig 类中的配置代码
@Override
protected void configure(HttpSecurity http) throws Exception {
    http.httpBasic();       // 1
    http.authorizeRequests()
          .anyRequest()
          .authenticated(); // 2
    http.csrf().disable();  // 3
}
以上配置的意思是:
| # | 说明 |
|---|---|
| 1 | 要求用户登陆时,是使用 http basic 的方式。 |
| 2 | 让 Spring Security 拦截所有请求。要求所有请求都必须通过认证才能放行,否则要求用户登陆。 |
| 3 | 暂且认为是固定写法。后续专项讲解。 |
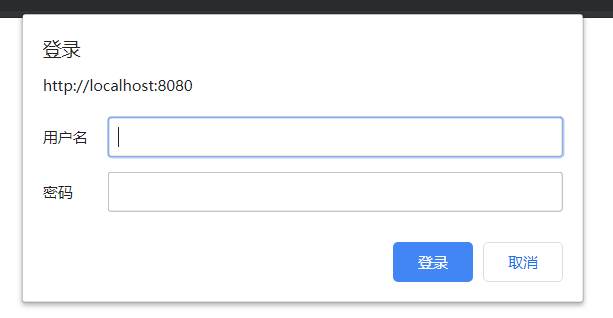
所谓的 http basic 方式指的就是如下图所示:

浏览器通过这个弹出框收集你所输入的用户名密码,再发送给后台(Spring Security),而 Spring Security(截至目前为止是)以配置文件中配置的信息为基准,判断你的用户名和密码的正确性。
如果认证通过,则浏览器收起弹出框,你将看到你原本的请求所应该看到的响应信息。
注意
有时你看不到这个弹出库那是因为你曾经登陆过之后,相关信息被浏览器缓存了。重开一个窗口即可,或使用 Chrome 浏览器的无痕模式。
不过,http basic 认证方式有很大的安全隐患,在浏览器将用户所输入的用户名和密码发往后台的过程中,有被拦截盗取的可能。所以我们一定不会通过这种方式去收集用户的用户名和密码。
代码配置的链式调用连写:
http.httpBasic()
        .and()
    .authorizeRequests()
    .anyRequest().authenticated()
        .and()
    .csrf().disable();
# 3.2 Spring Security 自带的表单认证
SpringSecurityConfig 类中的配置代码
@Override
protected void configure(HttpSecurity http) throws Exception {
    http.formLogin();     // 1   区别在这里
    http.authorizeRequests()
        .anyRequest()
        .authenticated(); // 2
    http.csrf().disable();// 3
以上配置的意思是:
| # | 说明 |
|---|---|
| 1 | 要求用户登陆时,是使用表单页面进行登陆。但是,由于我们有意/无意中没有指明登陆页面,因此,Spring Security 会使用它自己自带的一个登陆页面。 |
| 2 | 同上,让 Spring Security 拦截所有请求。要求所有请求都必须通过认证才能放行,否则要求用户登陆。 |
| 3 | 同上,暂且认为是固定写法。后续专项讲解。 |
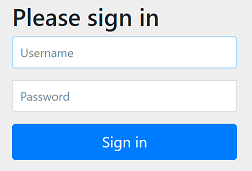
登陆页面效果:

这就是我们上一章所看到并使用的登陆页面。
你在这个页面所输入的用户名密码,在发送给后台(Spring Security)后,Spring Security(截至目前为止是)以配置文件中配置的信息为基准,判断你的用户名和密码的正确性。
代码配置的链式调用连写:
http.formLogin()
    .and()
    .authorizeRequests()
    .anyRequest().authenticated()
    .and()
    .csrf().disable();
# 4. 鉴权配置
当前用户是否有权限访问某个 URI 的相关配置也是写在 configure(HttpSecurity http) 方法中。
.antMatchers() 方法是一个采用 ANT 风格的 URL 匹配器。
- 使用
?匹配任意单个字符 - 使用
*匹配 0 或任意数量的字符 - 使用
**匹配 0 或更多的目录
| 权限表达式 | 说明 |
|---|---|
| permitAll() | 永远返回 true |
| denyAll() | 永远返回 false |
| anonymous() | 当前用户是匿名用户(anonymous)时返回 true |
| rememberMe() | 当前用户是 rememberMe 用户时返回 true |
| authentication | 当前用户不是匿名用户时,返回 true |
| fullyAuthenticated | 当前用户既不是匿名用户,也不是 rememberMe 用户时,返回 true |
| hasRole("role") | 当用户拥有指定身份时,返回 true |
| hasAnyRole("role1", "role2", ...) | 当用户返回指定身份中的任意一个时,返回 true |
| hasAuthority("authority1") | 当用于拥有指定权限时,返回 true |
| hasAnyAuthority("authority1", "authority2") | 当用户拥有指定权限中的任意一个时,返回 true |
| hasIpAddress("xxx.xxx.x.xxx") | 发送请求的 ip 符合指定时,返回 true |
| principal | 允许直接访问主体对象,表示当前用户 |
例如:
http.authorizeRequests()
    .antMatchers("/user/insert").hasAuthority("user:insert")
    .antMatchers("/user/modify").hasAuthority("user:modify")
    .antMatchers("/user/delete").hasAuthority("user:delete")
    .antMatchers("/user/query").hasAuthority("user:query")
    .antMatchers("/user/**").hasAnyRole("USER", "ADMIN")
    .antMatchers("/user-can-do").hasRole("USER") // 这里本质上应该是 ROLE_USER,但是 ROLE_ 要移除。不过你所提供的标准答案中,又必须要有 ROLE_ !
    .antMatchers("/admin-can-do").hasRole("ADMIN") // 同上
    .antMatchers("/all-can-do").permitAll()
    .anyRequest().authenticated(); // 2
警告
本质上 .hasRole("xxx") 和 .hasAuthority("xxx") 并没有太大区别,但是,.hashRole() 在做比对时,会在 xxx 前面拼上 ROLE_ 。
所以,确保你的 Role 的『标准答案』是以 Role_ 开头。
# 5. Session 配置
http.sessionManagement().sessionCreationPolicy(SessionCreationPolicy.STATELESS);
| 机制 | 描述 |
|---|---|
| always | 一旦登陆成功就创建一个 session 。同一个账户反复登录(不退出)时,会有多个 session 。 |
| ifRequired | 登陆成功就创建,同一个账户反复登录使用同一个 session 。(默认) |
| never | SpringSecurity 将不会创建 Session,但是如果应用中其他地方创建了 Session ,那么 Spring Security 将会使用它。 |
| stateless | SpringSecurity 将绝对不会创建 Session |